
For a while, I toyed with the idea of creating an HTML version of my résumé that looked the same as the paper version of it.
As a Web Developer, I thought it would be cool to send my CV as an HTML file instead of a PDF or a Word document. It would be original and help showcase some of the things I could do.
Note: while developing an HTML CV may be a cool project to complete and add a fun factor to the recruiting process, it may not be so practical. Especially considering that most recruiting sites don't support HTML uploads.
There were some obvious limitations and foreseeable problems, but I could work around them:
- It should not have JavaScript: many browsers block JavaScript when running on local files. It would be terrible if I sent my résumé and it got blocked by the browser while showing a nasty security message.
- It should work offline: if the person that was looking at the document didn't have an Internet connection, the document should still display correctly. So no CDNs or online images or files.
- It should be self-contained: I could not send a bunch of images, CSS, and HTML files, because if one was lost or not downloaded, the CV would look bad. Styling and images (SVG if needed) would have to be inline in a single HTML file.
- It should work in most browsers: using a fancy feature could fail and backfire. It had to work in most modern browsers... and that included IE11, which still prevails in corporate environments.
- It should be people- and machine-friendly: not only it should be web-accessible, but it should also be easy to process and understand by a computer... even when most recruiting sites don't accept HTML as a valid format to upload a file.
And with that in mind, I started working on the first version of the document.
First attempt
Mimicking my paper résumé in HTML was relatively easy, then I went one step forward and added some interactivity:

It looked OK, but I already had a paper version of that résumé. Even with some interactivity, it looked a bit meh and didn't have all it required. Also, I was not taking advantage of all the possibilities that HTML and CSS provided.
So I decided to go beyond that...
The extended version
Why limit it to looking like the boring paper-version? Or to be (semi-)static HTML? Or even to have a single visualization? Why make it only "human-friendly" if most résumés will be processed by machines?
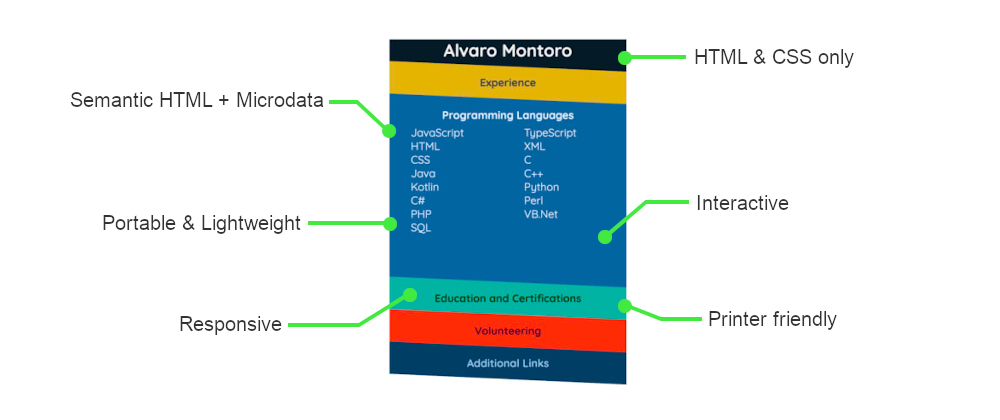
I developed a new version of the résumé, and this time it had more bells and whistles: an interactive experience that, when printed, looked like my regular paper résumé. Here is a demo:
To develop this version I focused on five key elements:
- A different spin on design and interactivity.
- Multiple style modes (for screen and printer).
- Use of semantic HTML.
- Metadata.
- Microdata.
The idea is that a curriculum vitae is both parts equal presentation (points 1 and 2) and data (points 3, 4, and 5). If the CV is visually appealing to a human reader, there would be more chances to catch attention. At the same time, CVs are normally processed by computers, so making them appealing for a machine reader is a big part of it too.
Semantic HTML
One of the big changes in HTML5 was the inclusion of many semantic tags. Developers don't need to stick to div or p and can use tags that convey some meaning to the content.
But let's not focus exclusively on the typical <section> or <main> (that you should use too). A curriculum vitae allows for the use of other semantic tags that are not so common such as:
-
<time>: indicates a period in time, and it is perfect to tag previous job dates or graduation dates, etc.; or -
<address>: it is important to point out that this is not used for a physical address, but the contact information of the people related to the closest<article>or<body>, and it can contain emails, URLs, Twitter handles...
Also, don't forget about <ul> and <ol>. They are not new HTML5 tags, but they are important too. One common mistake is using groups of <div> or <section> for what should be a list of elements. Your previous/current jobs and certifications are lists. Use them.
...I should take my own advice about lists, as I made this mistake while developing my HTML résumé 😬
If not making orthographic or grammar mistakes is important for a "paper résumé", for a web version, it is important to structure the content properly too. Don't forget to:
- Divide content into sections.
- Add headings for each section.
- Have a proper heading order (don't skip headings).
- Leave comments in the code.
- Use the proper semantic tags.
- Make it standard HTML and CSS.
- Think of browser support (even if it means leaving out some fancy stuff).
Structuring the content correctly will be incredibly helpful when styling it. But remember: you want your CV to look good even in plain HTML (without any CSS). That way, if something goes wrong with the styles, you will still have something viable.
Design & Interactivity
Now that we have our HTML structured and built, it is time to add some magic via CSS. I know this may sound like a cliché but, it is true, the only limit here is your imagination.
Highlight in "your". This section should be you. I can describe how I created mine, but then it wouldn't be personal for you. Ultimately, you are the one that needs to come up with a design and apply it.
As with the HTML, take into account the type of document and your target audience:
- Remember about color contrast and accessibility.
- Use a readable font (and don't forget common fallbacks!)
- Don't use flash colors.
- Don't use animations that could be distracting.
- Keep it professional.
...unless that's not what you want to go with. Again, this is your creative moment. Do what feels right (just make sure it is web-accessible.)
For mine, I chose a relatively simple card-style, with diagonal cuts, and in which the information is pushed up or down depending on which section is active (for more of that, continue reading).
Interactivity
We are not using any JavaScript, so adding interactivity is going to be a little challenge... but it's doable.
The trick is using visually hidden form elements –mainly radio buttons or checkboxes– to save the state of the document, keeping track of what section should be visible at each given time. Then you can activate/deactivate the inputs by using labels targeting them.
This is something that I've done before to create CSS games. It may take a little bit of time to get used to it, but it will be good practice for CSS, and it will help you learn a lot about selectors and modifiers.
Here is a simplification of how it could look:
<input type="radio" name="section" id="radio-section-0" checked />
<input type="radio" name="section" id="radio-section-1" />
<input type="radio" name="section" id="radio-section-2" />

<section id="section-0">
  <h2><label for="radio-section-0">Introduction</label></h2>
  <div>
    Content for the introduction.
  </div>
</section>
<section id="section-1">
  <h2><label for="radio-section-1">Previous Experience</label></h2>
  <div>
    Content for the Previous Experiences.
  </div>
</section>
<section id="section-2">
  <h2><label for="radio-section-2">Side Projects</label></h2>
  <div>
    Content for the side projects.
  </div>
</section>
input {
  display: none;
}

section > div {
  display: none;
}

#radio-section-0:checked ~ #section-0 > div {
  display: block;
}

#radio-section-1:checked ~ #section-1 > div {
  display: block;
}

#radio-section-2:checked ~ #section-2 > div {
  display: block;
}
You can see it working here (click on the titles to activate each section):
In my case, I have two sets of radio buttons:
- One keeps track of which section the user is in (defaults to the first one).
- The other one keeps track of which position (within the experience section) should be visible.
Just keep in mind that, the more radio groups that you have, the more complex the page will be.
Printing styles
We have a fancy looking interactive résumé, but if the user tries to print it, it doesn't look great. The solution: style the printed version in a different way to the screen version.
CSS allows for specific printing styles that go inside the print media rule:
@media print {
  /* styles specific for printing */
}
There we can define anything, different positions, displays, colors... anything CSS allows to do. But with the print media rule, developers can specify much more, like some default settings for the printer: page size, margins, page breaks, control of orphans and widows, etc.
One of the things I struggled with was the page size. And that is important. While screens operate in pixels, printers don't, and we may not get the expected result if we don't use the right paper size. In the US, the most common would be "letter", but you can specify others like A4, or specific values in px, cm, or other units:
@media print {
  @page {
    size: letter;
  }
}
By defining different styles for screens and printers, the visualization in both formats will be completely different:

It may be double the work, but the different results are worth it.
Metadata
I wrote an article about the importance of metadata in web pages (so they don't get "confused"). It includes information about metadata and microdata (see the following section), and all the content will apply here too.
Here are some things to add to your HTML interactive résumé:
HTML metadata
This is the classic <meta> tags that will contain general information about the document: author, title, description, etc. They are –or used to be– read by search engine crawlers and provide essential information about your page (in this case, your CV).
Some examples:
<title>[your name]'s Resume</title>
<meta author="[your name or link to your website]">
<meta name="keywords" content="[your name],resume,curriculum vitae,cv" />
<meta name="description" content="[your name]'s Interactive Resume" />
It may not be as important or relevant as it was before, but it still is. And it is a minor inconvenience to add them.
Social media metadata
We live in a connected world in which the document could potentially be shared in social media. Maybe not so much Facebook or Twitter, but LinkedIn or other professional networks.
So you may want to add OpenGraph meta tags, and maybe some social media meta tags too:
<!-- OpenGraph -->
<meta property="og:title" content="Resume of Alvaro Montoro" />
<meta property="og:type" content="document" />
<meta property="og:url" content="[link to your site]" />
<meta property="og:image" content="[link to your picture]" />
<meta property="og:description" content="[same as meta description]" />

<!-- Twitter specific -->
<meta name="twitter:card" content="summary" />
<meta name="twitter:url" content="[link to your site]" />
<meta name="twitter:title" content="[same as HTML title]" />
<meta name="twitter:description" content="[same as meta description]" />
<meta name="twitter:image" content="[link to your picture]" />
Take into account that these are all suggestions: their content doesn't have to be exactly the same as the HTML meta tags (even when in the end it might), and all of them are optional (especially looking at the picture, which may not be considered appropriate for a CV in some countries while a must in some others.)
Beyond metadata: microdata
While using HTML metadata and semantic tags is a great step, it doesn't provide all the information for a machine to process and understand the data contained in the document. For example, let's look at this code:
<section>
  <h2>Candidate</h2>
  <p>
    Name: <span>Alvaro Montoro</span>
  </p>
  <p>
    Email: <span>[email protected]</span>
  </p>
  <p>
    Website: <a href="https://alvaromontoro.com">https://alvaromontoro.com</a>
  </p>
  <p>
    Alvaro is a <span>Web Developer</span>
    that enjoys <span>HTML and CSS</span>.
  </p>
</section>
A computer will see that simple HTML code and think "Great! there's a section with a title and some content and a link", but it won't have a clue of what that content is. Some programs may be smarter and detect the email, yet the relationship between the content, the email, and the link won't be clear.
Wouldn't it be great if there could be a way to specify it? The good news is there is! By using microdata you can provide additional information about the content in itself. Information that may be obvious for a human reading it, but not so obvious for a machine. Let's make some changes in the code above:
<section itemscope itemtype="http://schema.org/Person">
  <h2>Candidate</h2>
  <p>
    Name: <span itemprop="name">Alvaro Montoro</span>
  </p>
  <p>
    Email: <span itemprop="email">[email protected]</span>
  </p>
  <p>
    Website: <a itemprop="url" href="https://alvaromontoro.com">https://alvaromontoro.com</a>
  </p>
  <p>
    Alvaro is a <span itemprop="jobTitle">Web Developer</span>
    that enjoys <span itemprop="knowsAbout">HTML and CSS</span>.
  </p>
</section>
Now the machine will see more than just a section. It will know that the section describes a person named Alvaro Montoro, who has the specified email and URL, and who also is a Web Developer specialized in HTML and CSS.
A human will not be affected by these new attributes in HTML, but the document will get a semantic boost thanks to them... if the machine that processes it understands microdata.
I will not dive into microdata –this section is getting too long already, I'll write a full article about it later if needed–, just know that itemtype is used to identify the type of data, itemprop is for a specific property within the type, and that there are different schemas available (you can see them on Schema.org), some of which will be helpful to build a curriculum vitae:
- Person: it can be used to describe yourself, your reference, or any person mentioned in the document.
- Organization: use it to describe the companies that you worked for.
- OrganizationRole: this will give details about your positions and roles (mainly title and duration).
- EducationalOrganization: used for describing the different schools, universities, boot camps, etc. that you took part in.
- CreativeWork: it can be used to describe any projects or artworks that you created and highlighted in your résumé.
That was another huge article that should probably have been broken into small and more detailed parts (maybe that's next). If you are still here... thank you for reading :)