

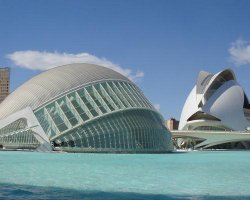
What is imageCloud?
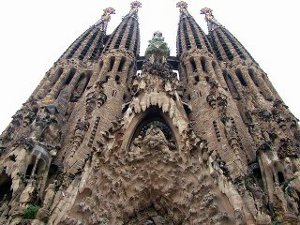
ImageCloud is a jQuery plug-in that creates an image gallery inspired by the Google's Doodle design for the Christmas holidays on 2010. The doodle consisted on a group of images and frames that, when placing the mouse over then, grew to their real size displaying the whole picture. It looked like this:
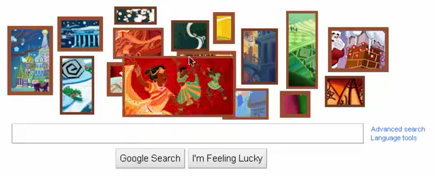
It was interactive too: each image would be a link to the different ways in which the holidays were celebrated in different parts of the world. I found the concept really interesting (and I was not the only one), so I decided to work on it and come up with my own version. As a programming challenge.
The result is this jQuery plug-in that I started developing in late December 2010, completed in January 2011, and rebumped in 2014 after (some needed) improvements to remove bugs, clean code, and add new functionalities that make it more useful than before.
If you have any question/comment/suggestion, feel free to contact me at alvaromontoro@gmail.com or visit my personal website for other cool plug-ins. And if you decide to use imageCloud, please send me a link to your page! I'll be happy to see that it is useful and how it looks :)
How to...
ImageCloud is super-easy to use. You only need three things:
- jQuery.
- The imageCloud plug-in.
- Some images to create the gallery.
Once that you have included the jQuery library and the imageCloud plug-in into your web page, place all your images into a div (other containers will work too), and add the class "imagecloud" to it. It really is that simple!
<div class="imagecloud">
  <img src="./upload/cloud1.jpg"  width="350" height="250" alt="1"  />
  <img src="./upload/cloud2.jpg"  width="200" height="300" alt="2"  />
  <img src="./upload/cloud3.jpg"  width="300" height="200" alt="3"  />
  <img src="./upload/cloud4.jpg"  width="200" height="300" alt="4"  />
  <img src="./upload/cloud5.jpg"  width="250" height="175" alt="5"  />
  <img src="./upload/cloud6.jpg"  width="250" height="200" alt="6"  />
  <img src="./upload/cloud7.jpg"  width="300" height="225" alt="7"  />
  <img src="./upload/cloud8.jpg"  width="300" height="200" alt="8"  />
  <img src="./upload/cloud9.jpg"  width="300" height="200" alt="9"  />
  <img src="./upload/cloud10.jpg" width="300" height="225" alt="10" />
  <img src="./upload/cloud11.jpg" width="300" height="225" alt="11" />
  <img src="./upload/cloud12.jpg" width="250" height="150" alt="12" />
</div>
The result looks like this (mouse over the pictures to see the animation):


You can open the example above on a new window by clicking here. Reload the page and see how the pictures are placed in different locations every time the page loads, also the pictures will have different sizes and each time a different part will be displayed.
But that's just the basic display. The imageCloud plug-in is highly customizable, and provides de user with many different parameters to get the desired effect:
| Parameter | Type | Default Value | Description |
|---|---|---|---|
| width | Numeric | 600 | It sets the width of the area where the image will be displayed. It is defined in pixels. Default value: 600. |
| height | Numeric | 400 | It sets the height of the area where the image will be displayed. It is defined in pixels. Default value: 400. |
| color | Color Type | #cc0000 | This is the border color for the images. Examples of correct values: "#ff00ff", "#ccc", "rgb(128,128,0)", etc. Default value: "#cc0000". |
| link | Boolean | false | If sets to true, then the images will link to the page indicated in the title attribute. Default value: false. |
| speed | Numeric | 200 | It indicated the speed of the effect in milliseconds; a lower value means a faster effect. Default value: 200. |
| borderSize | Numeric | 6 | It is the size of the box border in pixels. Default value: 6. |
| borderStyle | Border-style Type | solid | Defines the border style that the generated boxes will have. It is a border-style type (solid|dotted|dashed|inset|...). Default value: "solid". |
| borderRadius | Numeric | 0 | Makes the frame border rounded (similar to border-radius, it doesn't work in older versions of IE). Default value: 0. |
| boxWidth | Numeric | -1 | If a positive number is provided, all the images will have the same specified width. Default value: -1. |
| boxHeight | Numeric | -1 | If a positive number is provided, all the images will have the same specified height. Default value: -1. |
| random | Numeric | true | If set to true, the boxes will start displaying from a random location in the frame; If set to false, the pictures will start displaying from the top-left corner. Default value: true. |
If you set the "imagecloud" class to the box that contains the images, all the default values will be applied. If you want to modify them, you'll have to make a JavaScript call to the imageCloud function and specify the values that you want to change:
<script type="text/javascript">
  $(document).ready(function() {
    $("#myImageCloud").imageCloud({
      width: 500,
      height: 500,
      color: '#aabb44',
      link: true,
      speed: 150,
      borderSize: 3,
      borderStyle: "groove",
      borderRadius: 3
    });
  });
</script>

<div id="myImageCloud">
  <img src="..." width="..." height="..." title="http://www.alvaromontoro.com" />
  <img src="..." width="..." height="..." title="http://www.improvedin.com" />
  ...
</div>
You can visit this demo page that will allow you to check how changing the different values would affect the animation.
You may have noticed already that not only the pictures are displayed at random positions, with random sizes, but also the part of the picture that is shown changes every time that the page is loaded. This may be inconvenient in some cases as the displayed area may not be of interest.
Wouldn't it be great to be able to choose the size of the picture and the part that would be displayed? You can do that too! Apart from the parameters listed above, there are four attributes that can be set in the images and that turn imageCloud into an even more porwerful tool:
- data-width: width of the generated picture (in pixels).
- data-height: height of the generated picture (in pixels).
- data-posx: the top position of the area that you want to display from the image (in pixels). It only works if data-posy is specified too, and both are positive numbers.
- data-posy: the left position of the area that you want to display from the image (in pixels). It only works if data-posx is specified too and both are positive numbers
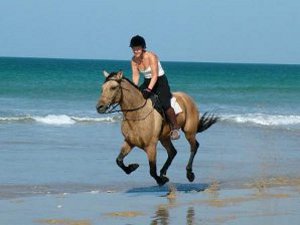
For example, imagine that we have this picture of a woman riding a horse, and we want to make sure that we display it with the same size and the same area every single time. For that we need to identify the size of the area to be shown (width and height), and the top corner of it within the picture (posx and posy):
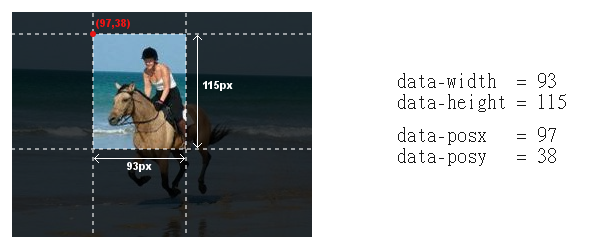
So if we add the attributes data-width="93" data-height="115" data-posx="98" data-posy="38" to the image, the generated picture will always be the same. And what better way to see than with an example? Here you can see it working:
You can open this web page to see the demo above on a new window. Notice that although the position of the images changes, the size and the area that is displayed for each of them remain always the same.
Download
You can download the latest version of imageQuery by clicking on this link. The zip file includes the source code (12K), minified version of the plug-in (5K), and some demo pages that show it working.
Also, don't forget to visit the imageCloud GitHub repository for past (and future) releases, and for new features.
Comments
Did you like imageCloud? Did you hate it? Please leave a comment with your ideas, comments and/or suggestions for this plug-in.